welcome!

I have always loved to create, design, play with color and textiles since I was a little. This is my outlet and the way I use my spare time. Granted, I like you, probably don't and won't ever have as much spare time as I'd like BUT I do try to make the most of it. Enjoy your spare time browsing my blog. Share any ideas, comments and websites.

Wednesday, April 27, 2011

Wedding Bells Card Set

How many weddings do you know about so far for this summer? Here are 3 elegant wedding cards and 1 graduation card for you to make to hold you over for the summer. We'll be making flower embellishments, a fold down card (for the grad card), a swing card and a stand up card. All sorts of new techniques! The pink paper, some of the white and black is all pearlized paper, giving it a more elegant look.

I'll be teaching this card set at Roberts in South Jordan only :( Sadly, Roberts is closing it's doors May 14th at Clinton, Centerville, and Sandy. BUT, I'm happy to mail you a kit with the directions and pictures for you to do at home. Just email me.

I do plan to continue putting cards and other projects up, and I'm thinking of continuing to make card sets to mail out if the interest is there. I'm looking into posting on etsy too.

Class:
South Jordan Roberts--Saturday, May 21st--10am-noon

Cost:
Packet and instruction $20
Packet/instruction/mailing $20

To bring:
  • favorite adhesive
  • large glue dots
  • scissors
  • bone folder

To sign up email me at: sparetymeprojects@gmail.com


This circle spins in a circle to view a swirly design on the back.
For the LIFE of me, I couldn't get this in the horizontal view (it is in my pictures!) I'll try to fix it...
This card stands up on it's own leaving space between the bell and the back to give it some dimension.

Wednesday, March 16, 2011

April showers bring May flowers card set


bird twirls across the sky back and forth


It's officially spring time and let's bring on the rain so we can have beautiful May flowers! We'll be making cards that revolve around fresh flowers and springtime. We'll make a pot of flowers where the flowers pull out so you can write on the stems, make a fluffy antiqued flower, a landscape scene, and a card where the bird twirls and spins across the page to land in the tree.


I'll be teaching at Roberts stores in Utah on the following dates:

Clinton: Tuesday, April 12th
South Jordan: Saturday, April 16th 10am-noon
Centerville: Wednesday, April 20th 6:30-8:30

Email me at sparetymeprojects@gmail.com to register for the class

Cost for instruction and packet is $20

Please bring the following to class:
  • scissors
  • favorite adhesive
  • dimensional foam squares
  • brown ink pad

Wednesday, February 16, 2011

Birthday Bash Card Set

I'm feeling the itch for spring to be here NOW! Aren't you? So I put together some springish colors for your birthday card needs! Here are the cards we'll be putting together for March. I'll be teaching the class at Roberts on the following dates and times.

Clinton: Saturday, March 12th, noon-2pm
Sandy: Tuesday, March 15th, 7-9pm
Centerville: Wednesday, March 16th, 6:30-8:30pm
South Jordan: Saturday, March 19th, 10am-noon

Cost: $20 instruction and kit

Please bring
  • paper trimmer
  • scissors
  • liquid adhesive (I like Tombo--the green/white bottle)
  • dimensional foam squares (we can make any size work, so bring what you have)
  • small hole punch
To sign up
email me at sparetymeprojects@gmail.com


Saturday, January 8, 2011

Pull It! 4 Card Class

Here's the February card class I'll be teaching at Roberts. This class is designed for all abilities. If you're starting out, I'm there to help and if you're a veteran here's a few new ideas. A few things that we'll be doing in this class is using the iRock tool, using cricut cut-outs, learn some new "pull cards" where you pull them and you get a surprise or a spot to jot a note. You'll learn how to make and customize your own rub-ons and how to make a pretty frame...just to note a few.

Taught at Roberts craft stores in Utah:
Centerville: Thursday, February 10th 6:30-8:30pm
Clinton: Saturday, February 12th noon-10am
Sandy: Friday, February 18th 7-9pm
South Jordan: Saturday, February 19th 10-noon

Class instruction and material cost is $20.

Email me at sparetymeprojects@gmail.com to sign up or if you have any questions.

Materials to bring:
  • liquid glue (I like Tombo--the one with the 2 green lids and white body)
  • paper cutter & scissors


Wednesday, November 24, 2010

Play dough cookies

Just try and tell me that these aren't the prettiest cookies eVeR! I was looking for a recipe to make regular play dough for the kids and ran into this and they looked oh so pretty online that I printed it off and let it collect dust for awhile. Well, lo and behold, they are not only pretty BUT they taste pretty good too. I attribute that to the tad of cream cheese that's in the recipe. Click here for the recipe.

Thursday, November 11, 2010

GO DIMENSIONAL Card Class

Here is the card class that I'll be teaching in January 2011.

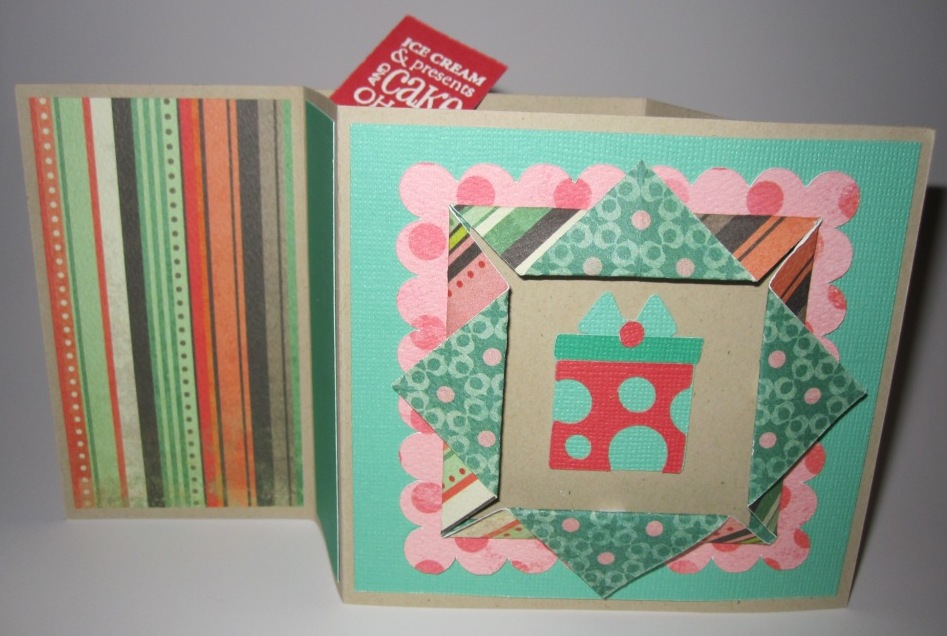
Add some life to your cards by having them stand on their own. Techniques you will learn are window fold technique, scoring to create dimension, accordion flowers, glassy accents, and much more. Each of the cards will fit into an A2 envelope and then pop open to stand on it's own. These work GREAT as birthday cards and get well cards for people to display on their tables.

Cost: $20 class and materials
Extra packet: $12 (will ship for additional $5)
Locations & Dates: Roberts craft stores
  • Jordan Landing, Friday, January 14th--7-9pm
  • Clinton--Saturday, January 15--noon-2pm
  • Sandy--Friday, January 21--7-9pm
  • South Jordan--Saturday, January 22--10am-12 noon

Card 1--Birthday card. Wet embossing on the red tag that pops out when you open the card. Learn how to do the window fold technique around the present.

Card 2: Thanks so Much. An easel card that stands open to show the sentiment. Using glossy accents on the flower for dimension.

Card 3: For You card. Accordion card and accordion flowers. Learn how to score, cut and fold to create this unique stand alone card with great flowers that can be used anywhere.

Card 4: Birthday card. Learn how to put an insert in the box that will pop up when you pull the ribbon with a hidden message to display while it's open.

Wednesday, June 23, 2010

The Best Hair Gel!!!

So....I have 2 little boys that have hair that sticks up pretty good..if that's the look you're going for. One of the boys has really wirey hair and some good cowlicks! I have tried a vast quantity of different hair gels. But guys and girls! I have found the answer! See below. It's awesome. No hairspray needed, it makes their hair stay through and throughout the day regardless of the activity! I don't use a ton on the 1 year old but enough to hold that hair up in the front and down in the back. Seriously, go get this stuff. You can find it at your local grocery store/Target/Walmart etc. It was only $5.99. BUT make sure you get exactly what is below. Yellow tube, silver top, spiking glue. The Got 2 be Glued brand has a ton of products!

Friday, June 4, 2010

Cards

Here is a card that I really love. It's not THAT difficult, just somewhat time consuming. I think the hardest part is the scalloped curved edge that is so pretty!


Quilt Block of the Month

I have found a quilt store that does a quilt block of the month for the whole year and then at the end you purchase the fabric for the sashing, borders and backing and sew the rest together and it's done! I like doing quilts this way IF I like the fabric and design. It teaches me new techniques or ways to put blocks together. I REALLY like this fabric line (don't know it off the top of my head) and love the colors. I'm going to make a king out of it for my bedroom. It's a good way to make a quilt because you do minimal every month then the quilt is half done by the end of the year and it's a matter of 10 hours max to put it together....well and then the quilting, whatever route you decide to go there. If you're interested, most cities have a quilt store that does something similar. It cost me $30 for the year for all the material and patterns for 12 different quilt squares.

Sunday, April 18, 2010

Purses II

Round 2 on purses for me. These are a little more user friendly because the top is larger, it can fit a notebook and the lining is super stiff (2 layers of fleece interfacing and 1 layer of interfacing) so it can stand up on it's own. Again...so fun! The pattern came with an embellishment such as a fabric rose, tie, rick rack etc....which I mean to put on...we'll see if it happens. Feels like it's already done.


Thursday, April 15, 2010

Amy Butler Etc

So...I've heard Amy Butler's name thrown around and finally checked her out...thanks to Amber's idea to make a purse from her website....here are a few things that I found that I need for my list of things to make.

Baby ring stacker--so cute!!!

Cool Purse

Pillows--I really need some color in my family room...perfect and somewhat inexpensive way to do it!

Girl Skirt--If only I had a girl!!!

Women's Shirt--If I made it would I actually wear it....??

Skirt--You could find some really awesome fabric...but I don't LOVE cotton skirts...

Friday, April 9, 2010

Purses

So I've had a LOT of fun lately making purses. They are pretty easy and quick and somewhat inexpensive for a craft project. Here are the latest. More coming soon (when I get pictures taken!) I made these with my sister and mom, so one for each of us! I think one of my favorite things is buying pretty fabric. For the pattern go here!


I love the opposite direction of these stripes.


Tuesday, March 16, 2010

Painted Pepper Grinder

So I'm not much of a painter, or haven't lately, but this is definitely an easy to easy medium craft. Just takes a wooden pepper grinder, sand paper and acrylic paint. I found this idea here and made it for a decent amount less and the exact colors I wanted for my sister's kitchen.

Pepper Grinder: I found one at Orson Gygi in SLC for $16 for a 12" one. Didn't have much luck at Bed Bath and Beyond and a few other places I tried. Well, I found them but they were upwards of $30 or so.

Scuff up pepper grinder with sand paper. I didn't do this and paid for it by doing TONS of coats of paint.

Decide on your color and pattern. I painted 3 at a time, basically so the wet paint was painted next to the wood or dry paint.

For the roses I painted red circles, used a really small brush to draw the black swirl on. In hind sight, I wish I'd made the roses a bit bigger to make it easier, but I like it just fine. For the leaves I painted in a light green and shaded one side with a darker green.

Everything else I just freehanded and made it work as I went along. Have fun being creative!

I don't love the top...I think it kinda looks like a lady bug...or maybe spilled pepper :)


I had LOTS of fun doing this project! I plan to make more for gifts...

Dolphin Cake

This is Jess's creation and I am so thankful to her for her ideas and help! Just wanted to share with ya'll.

The 3 year old was having an ocean birthday party and requested a dolphin cake. After searching and trying to decide how to make it we (Jess and I) decided to make a dolphin tummy down in the water. Then as she was brilliantly thinking...she decided to spice it up a bit and THIS is what we got. It turned out fabulous. Point being...it just takes a little creative thought, and guts to try something that may completely flop.
Jess bought plexi-glass and a plastic blind twisty thing that we cut. We super super glued with some magic stuff the plexi-glass together as seen below. We used a hot torch thing to bend the plexi-glass after it had dried over night. Wala!
Jess determined the curve of the dolphin for the tummy to place on the plexi-glass and secured it with butter cream frosting, yum!


We secured the plexi-glass to cardboard covered with tissue paper, with fish stickers in the "ocean" and then cellophane on top with frosting.

Now the creative part (as if none of this has been so far :) Jess used rice krispy treats smashed really hard together to shape the tail that the cake body was resting on, the dolphin nose and top fin. We made fins for the side but they didn't stay on. At 5 minutes after the party was supposed to begin we figured out the magical way to attach them but decided not to stress about it for a 3 year old's party. We should've gotten a dowel and made fresh rice krispy treats. Formed one fin on the side, put the dowel through and formed the other one. What I learned about shaping rice krispies for cakes is you have to MASH the rice krispies really hard together or they won't hold firm. Don't worry we did it right.


FROSTING RECIPE: We used Wilton's buttercream frosting for this (click on the link). Jess recommends that you use all butter and skip the Crisco for better tasting frosting. Meringue powder also gives the frosting a better consistency over whipped egg whites.
CAKE RECIPE: It's all about the Funfetti Cake mix and adding a cup of sour cream to make it extra moist! But truly, when it's for little kiddoes, it just needs to look cool, they don't care about taste so much.